
Customizing a fixed-gear bicycle, or “fixie,” is a popular way for urban riders to express their personal style and make their bike stand out on the streets. A fixie sticker serves as the most accessible and versatile tool for this customization, allowing you to transform a plain frame into a unique visual statement. These stickers come in various specialized forms—including die-cut vinyl, reflective decals, and printed wraps—and can be strategically placed across your frame, rims, hubs, and component accents. Achieving a clean, durable look requires matching the right sticker material to the specific physical demands of each bike part, ensuring your designs withstand both the elements and the mechanical friction of daily riding. Whether you are navigating the smooth paths of the Park Connector Network in Singapore or commuting through busy urban corridors, understanding how these materials behave on different surfaces is the first step to a successful custom build.
Understanding Fixie Sticker Types and Materials
To select the right fixie sticker, you must first understand the differences in vinyl quality and manufacturing. Standard printed stickers are typically made from monomeric vinyl, which is budget-friendly but prone to shrinking over time when exposed to heat. This shrinkage often leaves a sticky, dirt-attracting residue around the edges of the decal. For a longer-lasting finish, look for polymeric or cast vinyl options. Cast vinyl is exceptionally thin and flexible, allowing it to conform seamlessly to the complex curves of bicycle frame tubes without lifting.
Die-cut stickers offer a premium, painted-on look because they consist of individual shapes or letters cut directly from colored vinyl sheets, leaving no background material. This makes them ideal for clean, minimalist designs on down tubes or top tubes. In contrast, printed stickers feature full-color graphics printed onto a white or clear vinyl base, which is then laminated. While printed stickers allow for highly detailed artwork, they are generally thicker and less conformable than die-cut decals, making them better suited for flat or gently curved surfaces.
Products mentioned in this guide

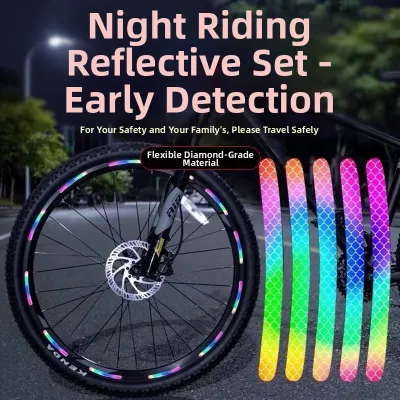
Prices are valid at publication and may change. Please refer to the product page for the latest price.
Reflective stickers utilize retroreflective technology, embedding tiny glass beads or microprisms into the vinyl to bounce light directly back to its source. This material is significantly stiffer than standard vinyl due to its multi-layered construction, meaning it requires extra care during application on curved surfaces. When shopping for reflective options, prioritize high-quality engineering-grade reflective vinyl, which offers superior light return and better adhesion to metallic and carbon surfaces.
Before purchasing any decals, always check the product labels or manufacturer specifications for explicit weather resistance and UV protection claims. In tropical environments characterized by intense sunlight and sudden heavy downpours, non-UV-resistant inks will fade within months, and cheap adhesives will quickly degrade. High-quality outdoor vinyl is rated to withstand these conditions, ensuring your designs remain vibrant and securely bonded to your frame through wet weather and intense sun exposure.
The choice between glossy and matte finishes should be guided by your bike’s existing paint texture. Applying a glossy sticker to a matte-finished frame creates a striking, high-contrast effect that draws immediate attention to the graphic. Conversely, using matte stickers on a matte frame delivers a subtle, stealthy aesthetic where the design is only fully visible under certain lighting angles. Matching the sticker’s finish to the frame’s texture creates a cohesive, factory-installed appearance rather than a mismatched, aftermarket look.
Frame Stickers: Placement and Design Strategies
The frame of your fixie is the primary canvas for customization, offering several distinct zones that influence how your bike is perceived. The down tube is the traditional location for large, bold statement decals, as it provides the longest and widest flat surface on the frame. Placing your primary graphic or brand name here establishes a strong visual anchor for the rest of your bike’s design.

The top tube is highly visible to you while riding, making it the perfect spot for smaller, personal details such as motivational quotes, subtle patterns, or country flags. When placing stickers on the top tube, consider your line of sight from the saddle; positioning graphics on the top surface allows you to appreciate them while riding, while side placement ensures they are visible to pedestrians and other cyclists. The seat tube offers a vertical canvas that is ideal for stacked lettering, crests, or repeating geometric patterns that complement the bike’s overall geometry.
To ensure the longevity of your frame stickers, you must avoid areas subject to high friction, moving parts, or frequent physical contact. If your fixie is configured with a rear brake, keep stickers clear of the top tube areas where brake cables might rub against the frame, as this friction will quickly fray and peel the vinyl. Additionally, avoid placing decals near the seatpost insertion point, where adjusting your saddle height can easily catch and tear the sticker edges.
Keep stickers away from the inner surfaces of the chainstays and seatstays, where tire clearance is tight. Road grime, water spray, and occasional tire rub in these areas will rapidly destroy any adhesive graphics. You should also avoid placing large decals on the sides of the top tube where your knees or thighs might rub against the frame during hard climbs or out-of-saddle efforts, as constant fabric friction will lift the edges over time.
Achieving a balanced aesthetic requires a thoughtful layout strategy rather than randomly scattering stickers across the frame. Start by placing your largest statement decal on the down tube or top tube to establish a focal point. Once the main graphic is positioned, use smaller accent stickers on the fork blades, seat tube, or stays to distribute visual weight evenly. Maintain consistent spacing between stickers and align them with the natural taper and lines of the frame tubes to preserve a clean, professional look.
Rim and Wheel Stickers: Safety and Aesthetics
Customizing your wheels can dramatically alter the profile of your fixie, but it requires strict adherence to safety guidelines to avoid compromising your bike’s performance. If your fixed-gear bike is equipped with a front or rear rim brake, you must absolutely prohibit placing any stickers on the brake track. Applying adhesive vinyl to the braking surface will drastically reduce stopping power, melt under the heat of friction, ruin your brake pads, and potentially lead to a catastrophic loss of control.
Even if you ride a pure brakeless track setup, placing stickers too close to the outer edge of the rim is risky. Tire levers used during flat repairs can easily catch and tear decals applied near the bead of the rim. For deep-section rims, keep your stickers centered on the flat profile of the rim wall, leaving a safe margin of clearance from both the tire bead and the inner spoke holes to prevent lifting during maintenance.
The physical impact of heavy or poorly distributed stickers on wheel balance is another crucial consideration, particularly for deep-section carbon or alloy wheels. While a single small decal will not cause noticeable issues, applying large, thick vinyl wraps to only one section of a wheel can create a heavy spot. At higher speeds, this imbalance can cause noticeable wheel hop and vibrations through the frame. To prevent this, distribute your decals symmetrically around the circumference of the rim, or check the wheel manufacturer’s guidelines regarding weight limits and balance recommendations.
Reflective rim stickers are an exceptionally practical safety enhancement for urban cyclists who ride in low-light conditions or at night. Placing reflective strips along the inner wall of your rims creates a dynamic, rotating light signature when illuminated by car headlights from the side. This lateral visibility is highly effective at intersections and roundabouts, where standard front and rear lights are less visible. Ensure these reflective strips are rated for outdoor marine or automotive use to guarantee they can withstand the centrifugal forces and wet road spray experienced by bicycle wheels.
Hub, Crank, and Bar Tape Accents
Small-scale customization on moving components adds a layer of depth and sophistication to your fixie’s appearance. Small die-cut stickers can be wrapped around the center sleeve of your hubs, creating a subtle flash of color as the wheels spin. The flat outer faces of your crank arms also offer an excellent location for minimalist branding or accent stripes that complement your frame’s color scheme.
However, these moving parts are high-wear zones that require protective measures to prevent premature damage. Crank arms are subject to constant heel rub, especially if you ride with straps, cages, or clipless pedals. If you apply stickers to your cranks, you must protect them with a layer of clear polyurethane paint protection film. This tough, transparent overlay shields the underlying decal from shoe scuffs, road grit, and grease, extending its lifespan significantly.
Avoid applying standard stickers directly to high-wear contact points such as the center of the handlebars, the stem body where computer mounts clamp, or the pedal bodies. The mechanical clamping force of accessories and the direct impact of your shoes will instantly tear and scrape away unprotected vinyl. If you wish to customize these areas, stick to recessed surfaces that do not make direct contact with tools, clamps, or your body.
Integrating custom stickers with your handlebar tape wraps is an excellent way to finish your cockpit with a professional touch. Instead of using the plain black electrical tape typically supplied with bar tape, you can use custom-printed vinyl strips to secure the ends of the wrap near the stem. To ensure these finishing stickers do not unravel due to hand sweat, friction, and humidity, apply them to a thoroughly degreased handlebar surface, and consider sealing the overlapping edge with a protective clear wrap.
Step-by-Step Application and Maintenance Checklist
The durability of your fixie stickers depends almost entirely on the quality of your surface preparation. Begin by thoroughly washing your bicycle with water and a mild soap to remove loose dirt and road grime. Once dry, use isopropyl alcohol or a dedicated bicycle-safe degreaser to clean the specific application area. This step is critical for removing invisible oils, wax, and grease left behind by your hands or chain lubricants, which prevent the sticker adhesive from forming a strong bond.
Dry the cleaned surface completely using a fresh, lint-free microfiber cloth to avoid leaving fibers behind. Ensure you are working in a clean, dust-free environment with a moderate ambient temperature. Applying stickers in extreme heat can cause the adhesive to become overly tacky and stretch the vinyl, while working in cold or highly humid conditions can trap moisture under the sticker and prevent the adhesive from curing properly.
For precise alignment of larger decals, utilize the dry hinge method. Position the sticker on the frame with its backing paper still attached, and secure it in place using a strip of painter’s tape across the center. Peel back one half of the backing paper, cut it away, and use a plastic squeegee or a credit card wrapped in a soft microfiber cloth to smooth the vinyl onto the frame, working from the center outward. Repeat the process for the other half, ensuring you apply firm, even pressure to expel all air bubbles and seal the edges.
If you encounter stubborn air bubbles after application, do not attempt to slice them with a blade, as this can damage your frame’s paint or clear coat. Instead, use a fine sewing needle to prick a tiny hole at the edge of the bubble, then use your thumb or squeegee to gently press the trapped air out through the hole. Once the sticker is applied, let the adhesive cure undisturbed for at least 24 hours before taking your bike out for a ride or exposing it to wet weather.
Maintaining your customized fixie requires gentle cleaning techniques to preserve the sticker edges. When washing your bike, never point high-pressure water jets directly at the edges of your decals, as the intense pressure can easily lift the vinyl and ruin the adhesive bond. Instead, use a low-pressure hose or a bucket of water with a soft sponge and a mild, pH-neutral bicycle wash. Avoid using harsh chemical solvents, citrus-based cleaners, or abrasive scrubbing pads, which can dissolve the printed inks and scratch the vinyl surface.
Frequently Asked Questions (FAQ)
Will stickers damage my fixie's paint when removed?
Sticker removal is generally safe for factory-cured bicycle paint and high-quality clear coats, but several factors can influence the outcome. If your fixie has a low-quality aftermarket paint job, thin clear coats, or existing paint chips, the adhesive bond of a strong vinyl sticker may pull up flecks of paint during removal. To minimize this risk, always use a gentle heating method to soften the adhesive before attempting to peel the sticker.
Using a hairdryer on a low-heat setting for a few seconds will warm the vinyl and make the adhesive pliable. Slowly peel the sticker back at a sharp 180-degree angle close to the frame surface, rather than pulling it straight up at a 90-degree angle, which puts maximum stress on the paint. Before applying stickers to a newly painted or touched-up frame, always test a small, inconspicuous area first to ensure the paint has fully cured and bonded to the tubing.
Can I apply stickers over existing scratches or rust?
Applying stickers directly over deep scratches or active rust is not recommended and will lead to poor results. Vinyl stickers are highly conformable, meaning they will sink into scratches and highlight the uneven texture rather than hiding it. More importantly, trapping moisture and air beneath a sticker applied over active rust will accelerate the oxidation process, allowing the rust to spread unseen beneath the vinyl and compromise your frame’s structural integrity.
To achieve a smooth finish and protect your frame, you must properly prep any damaged areas before applying decals. Use fine-grit sandpaper to smooth out the edges of deep scratches and remove all traces of surface rust until you reach bare metal. Treat the area with a rust inhibitor, apply a matching touch-up paint or a clear protective coat, and allow it to cure completely. Once the surface is smooth, clean, and sealed, you can safely apply your sticker to achieve a flawless look.
Community discussion
Share your experience or ask a question. Comments are reviewed before publication.