
Matching a training handle to your resistance bands requires aligning the physical connection mechanism of the band with the attachment hardware of the handle, while ensuring the handle’s structural load capacity matches or exceeds the band’s tension level. Using mismatched hardware or pairing a high-tension band with a light-duty plastic handle can lead to equipment failure, slippage, or sudden snapbacks during a workout. By verifying connection types, checking manufacturer-specified weight limits, and inspecting the assembly before every session, you can build a secure, highly functional home gym setup.
Identify Your Band and Handle Connection Types
Before purchasing or swapping accessories, you must identify the structural design of your resistance bands. Resistance bands generally fall into two primary categories: tube bands and flat loop bands. Tube bands are hollow latex cylinders that typically feature integrated fabric webbing, plastic plugs, and metal D-rings or carabiners at each end. These built-in connection points are designed specifically to clip directly into external handles.
In contrast, flat loop bands are continuous, flat ribbons of layered latex or fabric. They do not have built-in metal hardware or fabric loops. Attempting to clip a standard metal carabiner directly onto a bare latex loop band is highly unsafe, as the sharp edges of the metal clip can easily puncture or slice the rubber under tension.
Products mentioned in this guide
Prices are valid at publication and may change. Please refer to the product page for the latest price.
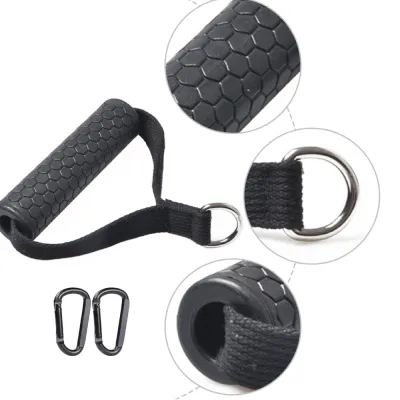
Training handles also feature distinct attachment mechanisms. The most common design includes a heavy-duty webbing strap terminated with a steel D-ring, which requires an external carabiner to connect to the band. Other handles feature integrated snap hooks or spring-loaded carabiners built directly into the strap. For flat loop bands, specialized handles utilize an open-sleeve or slot-style design, allowing you to thread the band directly through a smooth, rounded hollow tube or wrap it around a secure internal peg.
Recognizing these structural differences prevents you from forcing incompatible connections. Forcing a tube band’s carabiner onto a handle not designed for it, or wrapping a flat loop band tightly around a sharp metal D-ring, creates concentrated stress points. This mismatch can cause the band to slip mid-exercise or snap unexpectedly, highlighting the importance of matching the connection style to the band’s physical form.
Verify Brand Compatibility and Hardware Fit
Even when connection types seem compatible, hardware dimensions and proprietary designs can vary significantly between fitness brands. Many manufacturers design proprietary ecosystems with custom quick-release clips, threaded collars, or slide-lock mechanisms. These proprietary systems are engineered to work exclusively within that brand’s product line to ensure a precise fit and controlled load distribution.

To verify compatibility, always start by checking the manufacturer’s label, packaging, or user manual. Look for specific recommendations regarding compatible accessories or warnings against using third-party hardware. If you are attempting to mix brands, you must manually compare the physical dimensions of the connecting hardware.
Measure the thickness of the handle’s D-ring and compare it to the gate clearance of the band’s carabiner. If the carabiner gate is too narrow, it will not close completely over the D-ring, leaving the safety latch open and prone to failure under load. Conversely, if the carabiner is too thick for the D-ring, the joint will bind and lock up rather than pivoting freely during movement. This binding concentrates bending forces on the clip gate, which is the weakest part of the hardware.
Ensure that the metal-on-metal contact points do not pinch or rub against any surrounding fabric webbing or rubber sleeves. In humid environments, such as home gyms or outdoor fitness corners in Singapore, metal hardware is also highly susceptible to rust and corrosion. Corroded or stiff spring gates may fail to close fully, so verifying a smooth, self-closing action is essential before attempting to use any mixed-brand setup.
Match Handle Build and Grip to Your Resistance Level
Selecting the right training handle also depends heavily on the resistance level of your bands. Resistance bands exert progressive tension, meaning the force increases as the band stretches. A handle that performs adequately under 10 kg of tension may bend, crack, or shatter when subjected to 40 kg or more of pulling force.
Evaluate the core material of the handle against the band’s maximum tension rating. Light-duty handles often feature hollow plastic or thin PVC cores wrapped in soft foam. These are suitable for low-resistance exercises, such as physical therapy movements or shoulder mobility drills. However, heavy-duty training requires handles with solid nylon, reinforced ABS, or solid metal cores (such as steel or aluminum). These robust materials resist flexing and can safely withstand high-tension pulling exercises like rows, chest presses, and deadlifts.
Grip texture and diameter are equally critical for managing high resistance levels safely. When performing heavy pulls, a secure grip prevents the handle from slipping out of your hands, which could cause the band to snap back toward your body or face. Knurled metal, textured rubber, or patterned thermoplastic elastomer (TPE) grips provide excellent friction, even when hands become sweaty. Soft foam grips, while comfortable for light workouts, tend to compress completely under heavy loads, reducing your grip control and increasing hand fatigue.
Always locate the manufacturer’s weight or tension limits, which are typically printed on the handle’s packaging or detailed in the product specifications. Do not exceed these stated boundaries. If you are combining multiple bands onto a single handle to increase resistance, calculate the cumulative tension at peak stretch and ensure it remains well below the handle’s rated capacity.
Assemble and Inspect Your Setup Before Training
Once you have verified compatibility and load ratings, you must follow a systematic assembly and inspection protocol before starting your workout. Proper assembly ensures that forces are distributed evenly across the hardware, while a thorough inspection helps identify hidden wear and tear before it leads to equipment failure.
Step 1: Secure the connection. Attach the carabiner to the D-ring, ensuring the spring gate snaps completely shut and any locking collar is fully threaded and tightened. If you are using a sleeve-threaded handle for flat loop bands, thread the band carefully through the channel. Ensure the rubber lies completely flat without any twisting, bunching, or pinching against the edges of the sleeve, which can create localized friction and tear the material.
Step 2: Perform a visual and tactile inspection. Run your fingers along the entire length of the band, paying close attention to the areas near the connection points and plastic plugs. Feel for micro-tears, nicks, cracks, or areas where the rubber has become thin or brittle. Inspect all metal hardware for rust, hairline fractures, or bent gates. Check the stitching on the handle’s webbing straps for fraying, loose threads, or separation from the grip core.
Step 3: Apply gradual pre-tension. Before performing any dynamic exercises, anchor the band securely and pull the handle with gradual, controlled tension. Always perform this test pull in a direction away from your face, eyes, and body. This allows the hardware to seat properly and lets you verify the stability of the connection under a low, controlled load.
Stop conditions: You must halt your workout immediately if you observe any warning signs of failure. Stop using the equipment if you hear clicking, popping, or snapping sounds from the hardware or webbing. Immediately replace any parts if you notice metal clip deformation, if the band begins to slip out of its sleeve, or if you feel the handle’s inner core flexing or cracking under load. Equipment cannot replace proper safety checks and sound judgment.
Frequently Asked Questions (FAQ)
Can I use a door anchor handle with any resistance band brand?
Yes, but compatibility depends on the design of the door anchor. Universal loop-through door anchors, which feature a soft webbing loop, can accommodate almost any brand of flat loop or tube band, provided the band fits smoothly through the loop without excessive friction. However, proprietary clip-in door anchors that feature integrated metal rings or custom docking ports are designed to work only with specific brands. Always check the anchor’s loop size and material against your band’s width to prevent slippage, binding, or premature wear on the rubber.
How do I know if my train handle is rated for heavy resistance bands?
To determine if a training handle can handle heavy resistance, check the product packaging, user manual, or the manufacturer’s official website for an explicit weight or tension rating. Structurally, heavy-duty handles typically feature solid metal, reinforced ABS, or thick nylon cores, often paired with welded steel D-rings and heavy-duty nylon webbing with reinforced box stitching. Avoid using lightweight foam-covered handles with hollow plastic cores for heavy-resistance training, as these lack the structural reinforcement required to withstand high pulling forces safely.
Community discussion
Share your experience or ask a question. Comments are reviewed before publication.